Zoeken
Sluiten
yomani-xr-1

Yomani payment terminal quick start guide

Congratulations with your Yomani pinterminal!

The Yomani ML belongs to the newest generation of payment terminals. The terminal has a clear display, illuminated card readers and keys, and offers an integrated pin shield. A complete payment experience for your customer!

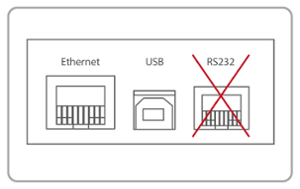
The terminal is easy to install and operates via Ethernet. The terminal uses a CTAP/cloud solution. In order to use this terminal in the best possible way, it is recommended to set everything up as well as possible. In this manual we give you some useful tips to set up the Yomani.

Watch instruction video

Step 1. Is your terminal complete?

Open the box and check whether the parts listed below, which are required for the connection, are present:

pay-icons-luijkmedia3

Yomani printerminal

Check if you did receive your terminal.

pay-icons-luijkmedia4

Adapter

Check if you did receive an adapter

pay-icons-luijkmedia2

Ethernet cable

Check if there is a ethernet cable.

pay-icons-luijkmedia

USB cable

If there is a USB cable too, you are ready to go!

Step 2. Connecting the Yomani Pinterminal.

pay-icons-luijkmedia2-1-1

1. UTP-cable (internet):

It is important that you connect the supplied Ethernet cable to the correct port. For a stable connection, we recommend connecting the terminal directly to an internet modem or router. Plug one end of the cable into your modem or router (internet connection) and the other end into the Ethernet port on your terminal (left-most port with a chrome border).

pay-icons-luijkmedia-2-1

2. USB-cable (power):

Now connect the USB cable supplied with the USB adapter to the mains outlet. It is important that the terminal is connected to a power supply 24/7 and is not switched off at night. Once all the plugs are connected, the terminal will start up automatically.

Yomani_handleiding_poorten-1

Attention:

The terminal only uses the Ethernet and USB port. The RS232 port (right) is not used.

Step 3. Making a test payment.

As soon as you have connected the terminal and the display shows "READ CARD" check that the terminal is working. To check this, we advise you to make a test payment of one cent. This can be done in various ways:

  • Within the terminal overview on Manage / Pinterminals tab in the Admin Panel you can make a test payment of one cent at the touch of a button via the money.png "test payment" button. In the same overview, you will also find important data and insights, for example, about the connection quality.
  • In the Pay. App for iPhone and Android, you can not only create payment links and QR codes on the "receive payments" tab but also start terminal payments.

We will explain this in the video to the right. Then continue with the next step.

Step 4. How do I start a terminal transaction?

Via Technical Partners:

If you are using one of the technical partners listed below, in most cases the terminal will work immediately after you have connected it. In some cases, you will need to enter some data such as your API token and ServicId in order to establish the connection with the Pay. platform. 

Via Mpos.nl, Collectdesk or the Pay. app:

If you don't have technical supplier to start the transaction with but still want to be able to make payments easily? We have different tools available to start making payments. You can find more information in our knowledge centre using the buttons below.

More information can be found on the website of your supplier.

Frequently asked questions.

The terminal indicates: "NO ECR Connection"

No ECR connection does not necessarily mean that the terminal cannot connect to your cash register, but means that it cannot connect to Pay.'s PIN server. This issue can have several causes:

  1. Make sure the Ethernet cable is properly connected. Make sure it goes to an Ethernet port that actually has an internet connection. We recommend that you plug it directly into your router. A common mistake is plugging the cable into the laptop's UTP port, for example. In general, this port doesn't provide an Ethernet signal, so the terminal cannot perform the desired actions.
  2. The terminal sends messages to multiple ports and IPs. If the network policy is too strict, some ports and IP addresses may have to be openened or whitelisted to allow the terminal to process its incoming and outgoing messages. An up-to-date list of ports and IP addresses can be found in our documentation.
  3. The server settings on the terminal are incorrect. In this step-by-step guide, we explain how you can check these settings and adjust them if necessary.

When I make a (contactless) payment, it does not work and the message "CARD REFUSED READ CHIP, MAGSTRIPE OR ANOTHER CARD" appears.

This message is triggered when the parameters of the PIN contract are not (or no longer) correctly loaded into the terminal. During the night, periodic updates of the software are carried out and the keys/parameters are refreshed. It is therefore important that the terminal is not switched off at the end of the day. This way, keys and parameters remain intact.

To refresh the parameters and reload them, carry out the following steps:

Every time I try to make a payment, the terminal shuts down and restarts.

The terminal is probably not getting enough power when sending the payment data to the transaction host. This often occurs when the terminal is connected incorrectly; for example, when the power cable is plugged into one of the USB ports of a computer or when an adapter is supplied which has too little power. The terminal will then start up, but for more intensive processes like payment processing it needs more power. The terminal must be connected to the mains power supply via the adapter provided.

Have you connected the terminal with the supplied adapter and the problem persists? Please contact our support department to help you out with a replacement adapter.

PIN refund transactions are aborted.

If you cannot successfully complete a PIN Refund, this may have several causes:

  • PIN Refund is not activated on this terminal. - To check whether PIN Refund is activated on the terminal, you can check the activated payment options on the terminal overview page in the Pay. admin panel. To do so, go to Manage -> Terminals. Under the column 'Card acceptance' you should see a logo with RETOURPINNEN (next to your terminal). If PIN refund isnt mentioned here you request this for the terminal in question by e-mailing the TH code (this can be found in the same overview in the format TH-1234-5678) to our onboarding department with the desired limits per day, transaction and number of transactions. Look for the possibilities in our PIN Refund documentation.
  • You are trying to make a contactless PIN Refund - PIN refund can only be made by inserting the consumer's card to which the transaction is to be refunded into chipreader in the top of the card terminal. The customer must then confirm the amount by pressing 'OK'. Contactless PIN Refunds are currently not possible.
  • You are trying to use the wrong card type for a PIN Refund - PIN Refunds are currently only available with Dutch Maestro and vPAY cards.
  • Insufficient funds - Balance too low - In order to make a refund, the merchant account must have sufficient balance to make the payment.
  • Merchant KYC status does not allow refunding - When your Merchant file is still incomplete or there are other administrative matters that have not yet been finalised, it may be that refunds are not allowed. You can resolve this by checking your clearing status.

How can I activate ApplePay or Google Pay on my Yomani terminal?

Apple Pay and Google Pay are actually authorisation methods, not payment methods. It depends on which card type the consumer (payer) has added to his wallet. Card types such as Maestro and vPAY can be processed by default. If your terminal is configured to process credit card transactions, customers that have added a credit card into his wallet, can pay without any problems.

Not all parts were in the box. What should I do?

Contact the helpdesk via chat, phone or e-mail to report a missing part. Our colleagues will send the missing parts to you as soon as possible.

My current cash register supplier or software supplier has no connection with Pay. Can I still use my Yomani Terminal?

You can always initiate a Terminal transaction via our online tools as described above. Do you have a tip for our partner management team to integrate with your software supplier? If so, please send the details to support@pay.nl.

Not all the payment products I would have liked have been activated on the terminal. How can I solve this?

To check which card brands your terminal accepts, carry out the following operations on the terminal:

  • Please press Stop » OK » brands (left button function button below the screen)
  • Displayed you see the loaded card brands
  • Exit the menu by pressing the Stop button.

If you would like to add additional brands such as Visa, Mastercard, Visa Electron or American Express to your Terminal configuration next to Maestro and vPAY, please refer to our documentation on how to apply for these payment methods.

Does my terminal have to have power and/or internet 24/7?

At night, periodic updates are performed and the keys/parameters are refreshed. It is therefore important that the terminal is not switched off after the end of the day. This way, keys and parameters remain intact.

To refresh the parameters and reload them, carry out the following steps: